Futures trading on Bybit usually seems simpler than it actually is. The interface is intuitive, the “Buy” and “Sell” buttons are right in front of you, and leverage can be set with a single click. But behind this simplicity lies a mechanism where a single mistake can cost you your entire deposit.
A typical scenario: a trader logs in, opens their first trade with 10x leverage, sees a +5% gain in a minute, then the market reverses—and the position gets liquidated. Not because the market “tricked” them, but because the basics weren’t set up properly.
This article provides a step-by-step breakdown without theory for theory’s sake. It covers what you actually need to do to get started and avoid losing everything on your very first day.
What are futures on Bybit and how do they work in practice
Futures trading involves working with contracts, not the cryptocurrency itself. In other words, you aren’t buying BTC or ETH; instead, you open a position on price movements. This allows you to profit from both rising and falling prices.
The key point is leverage. It increases the size of your position relative to your deposit. In simple terms, leverage is the ability to trade not only with your deposit but also with an “increased” margin balance provided by the exchange. And it is precisely this that makes futures both attractive and dangerous.
To illustrate this in practice, consider the following scenario:
- You have $100
- you set the leverage to x5
- you open a $500 position
If the market moves in your favor by 2%, you make about a 10% profit. But if the price moves against you by the same 2%, your loss also increases, and at a certain level, the position will simply close automatically.
And here’s the key point. Futures aren’t about “predicting the direction,” but about risk management.
Futures Trading Glossary: Terms You Need to Understand What’s Going On
Futures trading on Bybit quickly starts to look like a jumble of incomprehensible words. PnL, margin, liquidation, funding—if you don’t understand them, the interface turns into “press a button and hope for the best.”
But the good news is that there aren’t that many basic terms. And once you understand them, trading stops being chaotic.
Here are the key concepts that are actually used in practice:
- margin – the amount involved in a trade
- leverage – how many times the position is increased
- liquidation – the moment when the exchange closes a position due to a loss
- PnL – the current profit or loss on a position
- long – a bet on a price increase
- short – a bet on a price decline
- funding rate – a periodic fee charged between market participants
- order – a request to open or close a position
Now, let’s break it down in layman’s terms to explain how this feels in real trading.
When you open a position, you use margin—that’s your money in the trade. Leverage increases the position size, making price movements more sensitive. PnL shows how much you’re currently in the black or red, but this isn’t a guaranteed profit.
Liquidation is the point where the exchange says “enough” and closes the position so you don’t go into debt. This is what beginners fear, and it’s what they most often face due to high leverage.
The funding rate is a more nuanced concept. In short, it’s a fee between traders that can either slightly eat into your profit or, conversely, add to it. It’s barely noticeable on short trades, but it starts to play a role when holding a position.
The practical takeaway is that you don’t need to memorize all the terms at once. It’s enough to understand the basics—margin, leverage, liquidation, and PnL. The rest will fall into place as you go, when you start seeing these terms in real trades rather than just in theory.
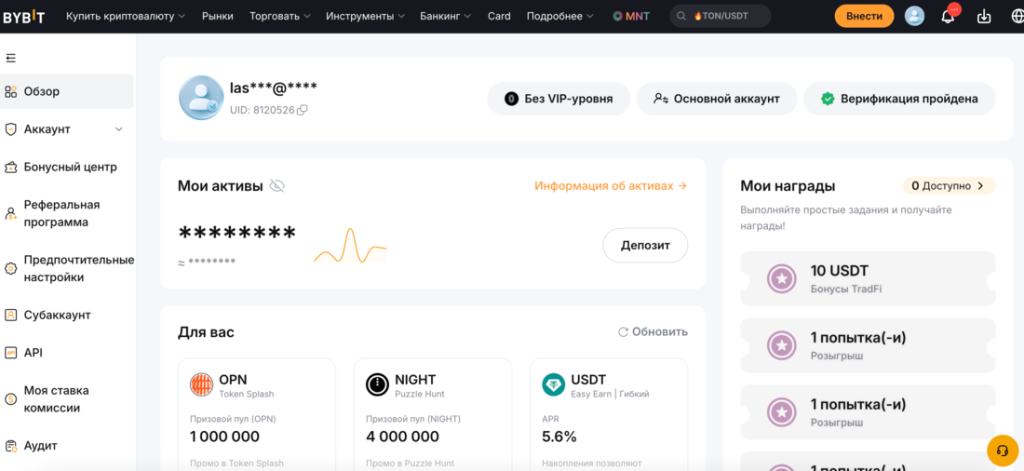
Getting Started on Bybit and Preparing for Futures Trading
Before opening your first trade, it’s important to set up your account correctly and understand where the main settings are located. At this stage, there’s no need to rush into the market: first, you should fund your account, transfer funds to the appropriate account, select the contract type, and familiarize yourself with the terminal’s basic features.
Below is a step-by-step guide to help you smoothly navigate the process from registration to your first futures trade on Bybit.
Step 1. Registration and Basic Account Setup
It all starts with a standard registration on Bybit. The process is standard—email or phone number, password, confirmation. But there’s a nuance that many overlook.
After logging in, it’s best to go through the basic security setup right away. This isn’t something you should put off “until later,” because access to the exchange means access to your money.
In reality, it goes like this: you log in, see your balance, the interface seems simple, and you want to jump right into trading. But it’s better to spend a couple of minutes and take care of the basics:
- enable 2FA
- check your email
- set up notifications
This doesn’t affect your profits, but it directly affects the security of your funds.
Step 2. Funding your account and making your first deposit
You cannot trade futures without a deposit, so the next step is to fund your account. USDT is most commonly used because the majority of contracts on Bybit are pegged to it.
There are several ways to fund your account: transferring crypto from another exchange, buying via P2P, or paying with a card. Beginners often choose P2P because it’s the easiest option.
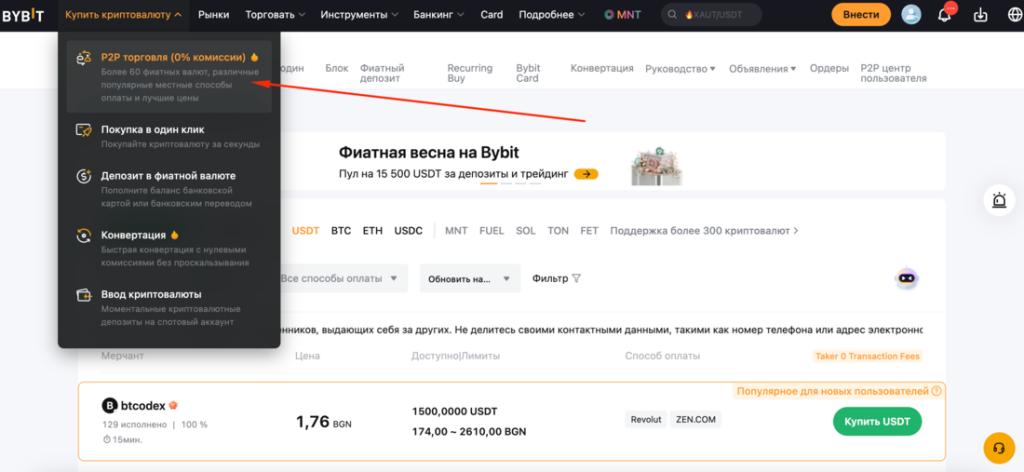
Here’s a common scenario: a user buys USDT via P2P, the funds appear in their main account, and they think they can start trading right away. But then there’s a pause—the buttons are there, but they can’t open a position.
And this is where the next step comes in.
Step 3. Transferring funds to the futures account
On Bybit, funds are separated between accounts. There is a main (funding) account and a derivatives (futures) account. Without transferring funds between them, trading simply won’t start.
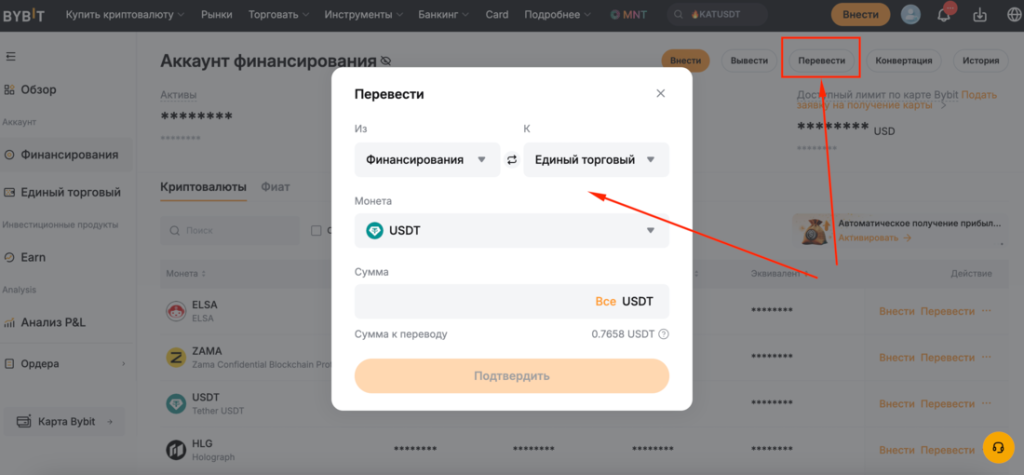
This step takes just a couple of clicks, but it’s the one beginners most often skip. In the interface, select the asset (usually USDT), specify the transfer direction and the amount.
Experience shows that if funds aren’t “visible” in the trading terminal, in 90% of cases they’re simply in the wrong account.
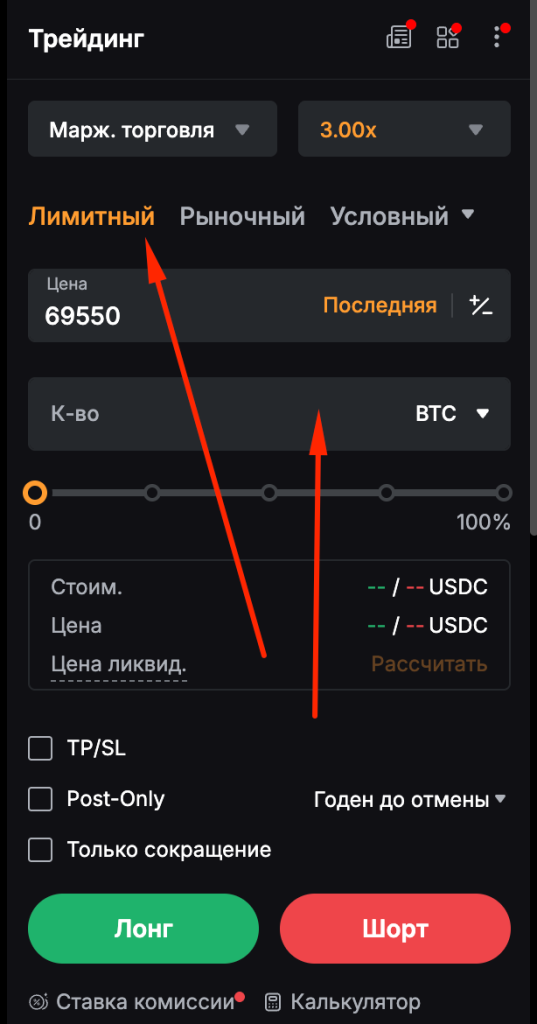
Step 4. Switch to the futures terminal and familiarize yourself with the interface
After transferring funds, you can go to the derivatives section. Usually, people choose USDT Perpetual—it’s the most straightforward and common type of contract.
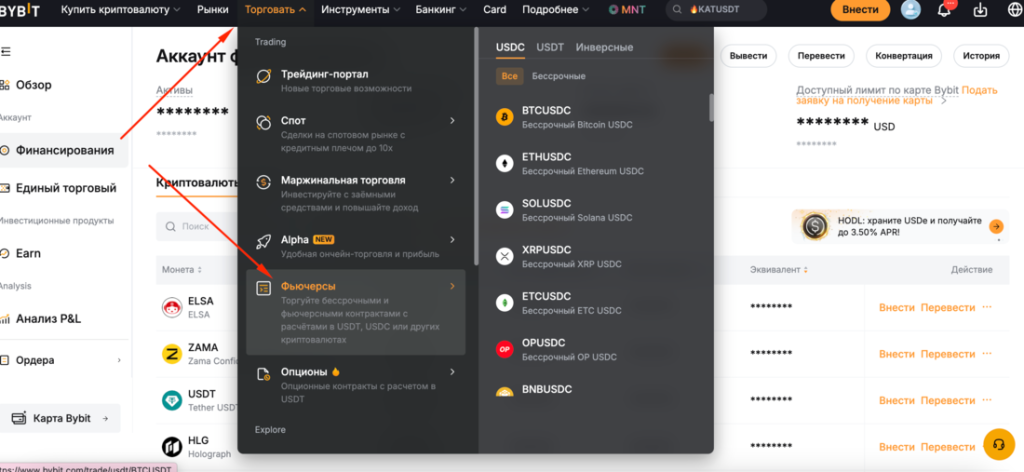
At first glance, the interface seems cluttered, but in reality, you don’t need to understand everything at once. It’s enough to grasp the structure: where the chart is, where the order is, and where the positions are.
Almost all the action takes place on the right side of the screen, where trades are opened. And if you strip away the unnecessary details, the logic is quite simple: choose your leverage, enter the amount, and click the button.
But before that, there is an important step.
Step 5. Choosing Leverage and Why It’s Critical
Leverage is the main lever that determines whether trading will be controlled or turn into a casino. And this is exactly where most beginners make their first mistake.

On Bybit, you can set leverage to very high levels. But the problem is that as leverage increases, the margin call distance decreases. In other words, the position becomes more “fragile.”
A simple real-world example: with 2x leverage, the price can move 10% against you and the position will still survive. With 10x leverage, a 1–2% move is enough to cause problems.
Therefore, the basic rule is:
- start with 2x–3x
- don’t increase leverage “out of greed”
- learn to control your position first
It’s boring, but risk management is what separates those who stay in the market from those who blow their deposit in a single night.
Step 6. Opening a trade – how Long and Short work on Bybit
Once you’ve selected an asset and set your leverage, you can move on to trading itself. It all comes down to two buttons: Buy (Long) and Sell (Short).
- Long – a bet on an increase.
- Short – a bet on a decline.
Otherwise, the logic is the same: select the order type, specify the amount, and confirm the trade. However, unlike spot trading on Bybit, here you also need to select the leverage.
In practice, it looks like this. The price of BTC is at $50,000, and you have a feeling it will go up. You open a Long position, and if the price does indeed rise, the position starts to generate a profit.
But the key point here isn’t even the direction—it’s managing risk after entering the trade.
Step 7. Stop-loss and take-profit: where control begins
Once the position is opened, the most important part begins. Because without a stop, any trade turns into a “let’s see what happens” situation.
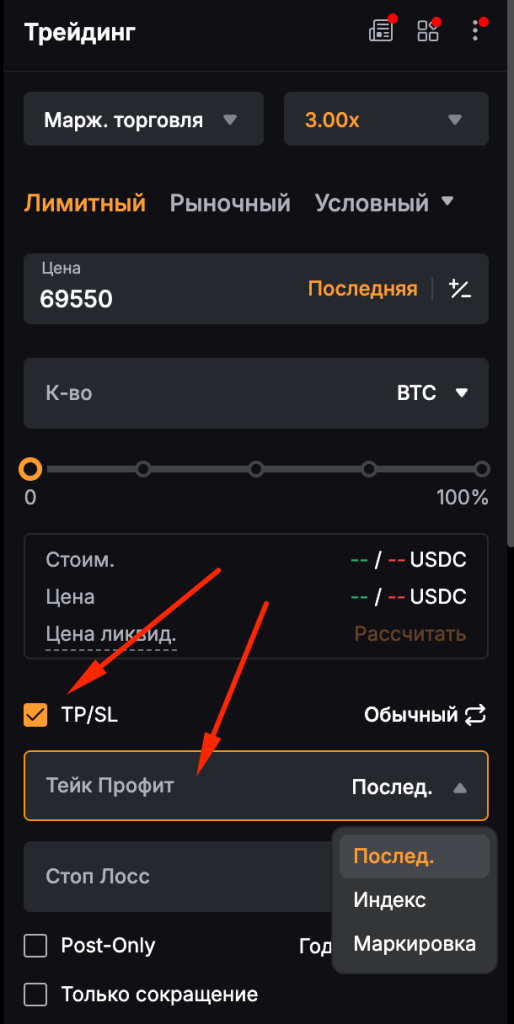
A stop-loss limits losses to a specified price level. A take-profit locks in profits at a specific level as well. And it is this combination that makes trading predictable rather than chaotic.
A practical example: entering a BTC trade at $50,000, with a stop at $49,000 and a take-profit at $52,000. This is no longer a random bet, but a clear-cut scenario with a predetermined risk.
Most problems start when a user thinks, “I’ll set it later” or “it’ll work out anyway.” Usually, it doesn’t.
Step 8. Position Management and the Point Where You Lose Money
The work doesn’t end after opening a trade. You need to monitor the position’s status because the market can move sharply and without warning. You can find your open position at the bottom of the chart.
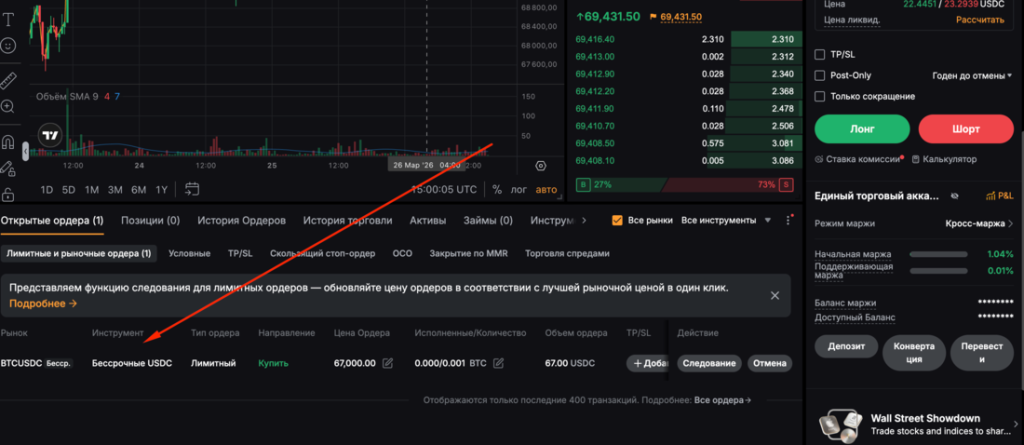
The main parameters to watch are profit/loss, liquidation level, and used margin. And here an important psychological factor comes into play. You can also click the “Cancel” button to cancel the order.
When a position is in the black, you want to wait a little longer. When it’s in the red, you want to “sit it out.” And this is exactly what most often leads to losing money.
In practice, a more effective approach is to take profits before the situation becomes “perfect” and cut losses before they become “painful.”
Step 9. Closing the trade and locking in the result
Closing a position is just as important a step as entering it. Because this is where the result is locked in, not on the chart.
You can close a trade manually, or you can wait for a take-profit or stop-loss. But it’s important to understand: as long as the position is open, the profit isn’t real.
A practical point that is often overlooked: it’s better to close at +3–5% and move on to the next trade than to wait for the “perfect exit” and lose what you’ve already earned.
Cross Margin and Isolated Margin on Bybit: What’s the Difference and How to Avoid Liquidation
When it comes to choosing a margin type on Bybit, it may seem like a minor setting. In practice, it’s one of the key factors that determines whether you’ll lose or preserve your capital.
Cross margin and isolated margin are two different ways of distributing risk within a position. And the difference between them isn’t in the interface, but in the consequences.
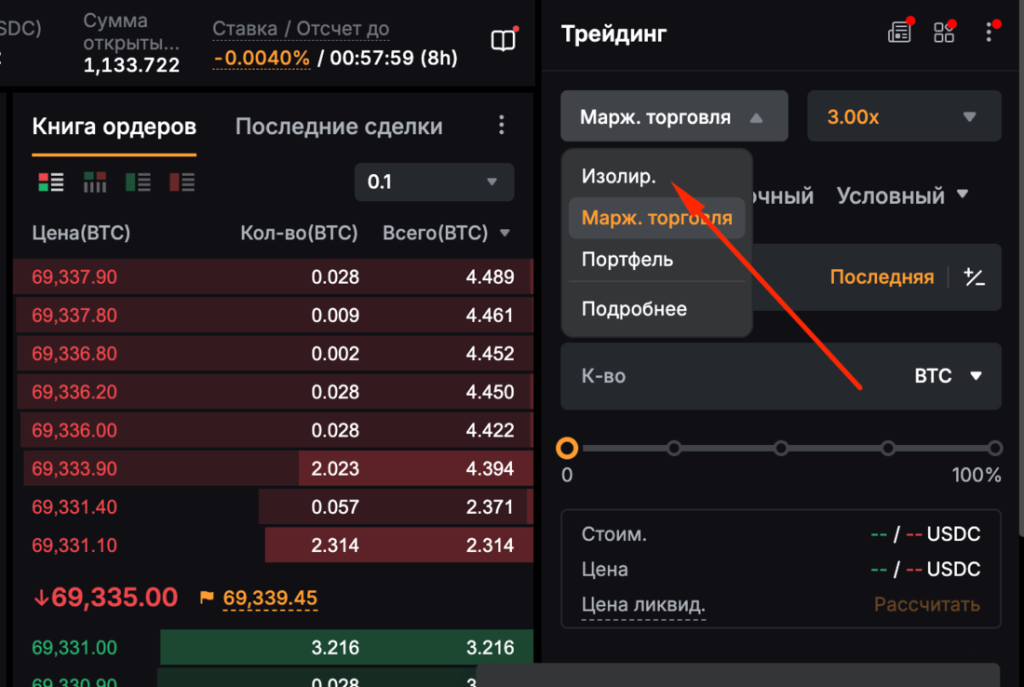
Cross margin uses your entire account balance to support the position. That is, if the trade goes against you, the system will “draw” funds from your entire account to prevent liquidation. On the one hand, this increases your chances of “riding out” the price movement. On the other hand, in the worst-case scenario, you could lose almost your entire balance.
Isolated margin works differently. Only the amount you’ve allocated is involved in the trade. If the price reaches the liquidation level, the position closes, but the rest of the balance remains untouched. This seems harsher, but in practice, it’s often safer.
Here’s a real-life example. You have $500 in your account. You open a $100 trade:
- with cross margin, all $500 is at risk
- with isolated margin, only that $100 is at risk
And here’s where the choice comes in: either let the position “breathe” using the entire balance, or strictly limit the risk.
How to use this in real trading:
- cross margin is suitable if you trade carefully, with low leverage, and understand the market
- isolated margin is better for beginners and aggressive trades with a clear loss limit
- When testing strategies, isolated margin is almost always used
- Cross margin is convenient when you have multiple positions and need to manage your balance flexibly
A common mistake is to enable cross margin “just because it’s the default” and then wonder why a single losing trade wipes out your entire deposit. So the logic at the start is simple: isolated margin gives you more control, even if it seems less flexible.
How to average a position on Bybit futures and when it makes sense
Averaging is adding volume to an already open position to change the average entry price. On Bybit, this is easy: you need to open an additional order in the same direction as your current position.
For example, you opened a long position on BTC at $50,000, but the price dropped to $49,000. If you buy another portion of the position at $49,000, the average entry price becomes lower. After that, the market no longer needs to return to $50,000 for you to break even—it’s enough for the price to rise above the new average price.
How to average down in practice:
- open an existing position in the trading terminal;
- make sure the trade direction is the same—Long to Long or Short to Short;
- place an additional order for a smaller volume;
- check how the average entry price has changed;
- be sure to recalculate your stop-loss and risk.
The main mistake beginners make is averaging down without a plan, simply because the position has gone into the red. This is dangerous: the additional volume increases the margin load and can bring liquidation closer.
Averaging down only makes sense when the trade is calculated in advance, the leverage is low, and there is a margin buffer in the account. If the price moves against the position due to an entry error, it’s better to cut your losses than to keep adding volume indefinitely.
Common beginner mistakes and how to avoid them
The mistakes here are quite repetitive. People don’t invent new ways to lose money—they simply ignore the basic rules.
The most common scenarios:
- using too much leverage
- not setting a stop-loss
- risking the entire deposit
- trying to “recoup” losses after a drawdown
And it almost always plays out the same way: the first successful trade gives a sense of control, followed by a series of rash decisions.
The practical conclusion is simple: futures are not about speed, but about consistency. And the calmer the pace, the higher the chance of staying in the black.
Conclusion – how to get started and avoid blowing your account in the first few days
Futures trading on Bybit is a tool that offers more opportunities than spot trading. But at the same time, it requires more attention to detail.
If you strip away all the excess, three key things remain:
- moderate leverage
- mandatory stop-losses
- position management
Everything else comes with experience. But the absence of these basics almost always leads to the same result.
And if you keep this in mind from the start, futures cease to be a “scary zone” and become just another working tool.